Daring Bakers June 2011: Team Baklava!
Erica of Erica’s Edibles was our host for the Daring Baker’s June challenge. Erica challenged us to be truly DARING by making homemade phyllo dough and then to use that homemade dough to make Baklava.
I have to confess I was a bit daunted by this one! The recipe called for a LOT of kneading and a LOT of rolling - and I have dodgy wrists and problems with tendonitis, so there was a fair amount of scope for injury and pain. And much as I'll take baking to fairly extreme levels, I'd prefer not to injure myself in the process.
But by leaving it to the last minute, an ideal solutions presented itself: I suddenly realised it was the last weekend of June, and I HAD to do the challenge, or I'd not be able to post today, but we were going to spend the weekend at my folks. So I brought some ingredients with me, "borrowed" some from Mum's cupboard, and roped her and my Dad in to help knead, then Mr E was drafted in for the dough rolling - so we made team Baklava. And it turned out well :o)
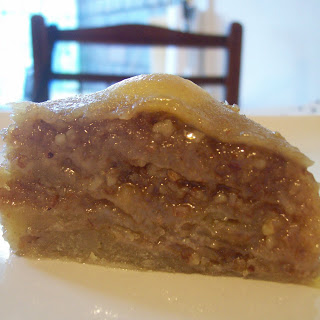
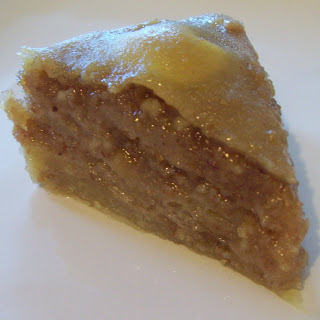
As usual, I was unable to resist messing about with the original recipe. I didn't use butter, to make it dairy free, but instead used non-dairy sunflower margarine, melted. I didn't use as much as the recipe said, because I figured it wouldn't impart a nice buttery taste, and margarine overload isn't cool. I also didn't have pistachio nuts, and substituted that other well known nut variety... the gingernut! Yep, that's right, I used crushed up biscuits as one of my 'nuts' and it worked really well - and added an extra layer of spicyness to the filling. I also used set heather honey to make my syrup, white has a very strong and distinctive taste, which was delicious in the finished product.
So there you have it - dairy-free gingernut baklava!
For anyone interested... here's my modified recipe.
Dairy-Free Gingernut Baklava
Makes 1 9in round baklava which cuts into about 20 pieces. Rolling with a pasta machine or dowel would probably make it go further
Dough:
- 185g plain flour
- generous pinch of salt
- 105ml water
- 30ml vegetable oil, plus a little more for coating the dough
- 1/2 tsp cider vinegar
Sift flour into a large bowl, and add the salt. Measure the water, oil and vinegar into a jug and give a quick whisk, then pour into the flour and mix together well with a wooden spoon or spatula until it forms a soft but not too sticky dough, adding a little more water if required. Tip out onto a floured work surface, and knead for about 20 mins - do so quite vigorously, giving it a few good bashes and drops onto the counter top. Shape the dough into a ball, lightly coat with a little extra oil, cover in cling film, and leave to rest. The original recipe says 30-90mins - I left it for about 4 hrs!!! Seemed fine tho, despite my distraction.
Filling:
- 180g almonds (I used skin on)
- 140g walnuts
- 140g gingernut biscuits
- 150g unrefined granulated sugar
- 1/3 of a cinnamon stick
- 12 allspice berries
Put all of the filling ingredients in a food processor and blitz until they are ground. I then sifted through them to remove any bits of cinnamon stick and allspice berries that hadn't blended very well. Put in a bowl and set aside.
Syrup:
- 200g set heather honey
- 300ml water
- 280g sugar (unrefined granulated)
- 1/3 of a cinnamon stick
- A chunk of lemon peel (mine was about a quarter of half a lemon that had been squeezed for juice for another recipe)
- 5 cloves
Put all of the syrup ingredients in a pan. Simmer for 10 mins, then remove from the heat, allow to cool, and strain out the bits.
Assembly:
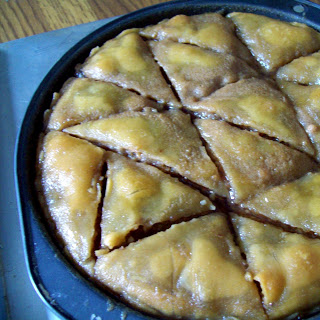
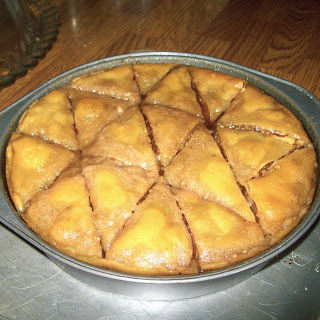
Take a golf-ball sized piece of dough at a time (keep the rest of it wrapped in the cling-film) and roll it out on a well floured surface. You can do it with a pasta machine to get it super thin, or use a dowel, like in the original recipe, or just use a rolling pin, and a helpful husband, like I did! You need to get it as thin as possible - we went for a combination of rolling and stretching (a la pizza chefs) and it seemed to work ok. Make a pile of the rolled out pieces, using a generous dusting of flour between the layers to stop them sticking.
Brush the insides of your tin with the melted margarine. If you want to be neat, and you've rolled fairly uniform pieces, then set your tin on top, and cut round it, to shape the dough to your tin. Ours were a bit free-form, so we went with just folding in the excess pastry on each layer. It made the finished layers a bit thicker in places, but still got the overall effect, tasted good, and minimised the wasted trimmings.
Put a layer of dough in the bottom of the tin, and brush all over with melted margarine. Add another layer of pastry on top, and do the same. Then sprinkle a generous layer of the ground nuts and sugar filling. Then add another 2 layers of margarine-d dough, more filling, dough, filling etc, until you run out of dough. The original recipe suggests 4-5 layers of pastry at a time, but since we only got 12 in total (due to our manual rolling pin rolling) we went with 2. Brush the top with melted margarine again, and with a very sharp knife mark it into pieces.
Stick it in the oven at 180C (Gas 4) for 30 mins, then take it out, and cut along the marks you made earlier again. I also added a little more melted margarine on the top at this point, because I had some left, and it was looking a wee bit dry. Return to the oven for another 30 mins, until the top is evenly golden brown.
Once out of the oven, leave to rest for about 15 mins then pour over the syrup. I poured until the syrup was up to the level of the top of the pastry, left it to soak in, and an hour later topped it up to this level again. I still had quite a lot of syrup left (some of which I used with a bit of white wine to make some gravy for roast pork tonight!!!!), and it made a very sticky baklava.
Wait until completely cold before cutting again, and enjoying. Stored in an airtight container at room temperature, this baklava will keep for a couple of weeks - which is good, because it is so sweet, you only need a small bit at a time.